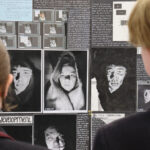
In Moving Image Arts pupils study a range of film making techniques from dramatic special effect creation using After Effects through to claymation and rostrum animation. One animation technique that has grown in popularity thanks to the graphics tablet is the challenge of digital rotoscoping.
This film by one of our talented AS students Adele Atchison is a stunning example of what can be achieved.
1. Film your Scene
It is important to remember that an animation still needs a good narrative. The animation still needs to be planned, storyboarded and executed well if the animation is to work. The film is shot and then edited into a story using Apple’s Final Cut software.
2. Exporting your film as Images
Film and animation is fundamentally a series of still images. In Final Cut we export the film as a series of still image files. Everyday film and television programmes are 24 still images for every one second we watch. The good news is that in animation we can reduce this number down to around 12 frames per second. This means every other frame can be deleted from our export. Final Cut makes this easy as it numbers each frame in the file name so it is a matter of simply removing the even numbered images from the folder.
Alternatively you can chose to export the original at 12 frames per second but in our experience exporting at 24 frames makes the drawing process easier.
3. The Drawing Challenge
Using a Wacom Bamboo graphics tablet we load our images into Photoshop Elements (this software shipped with the tablet). In Photoshop we open each single frame and apply a new layer on which we trace the footage underneath. Once the drawing is complete we hide the original layer so only the drawing is visible. The more effort invested in each frame the better the final rotoscope will look but remember a 1 minute film = 60 seconds, each second is 12 images which results in a total of 720 photoshop drawings. Once a frame is complete is saved to a new folder with the same file name.
4. Importing to QuickTime
Once all the frames have been drawn we import the still images into Quicktime and then export them out as a moving image film film (.mov or .mp4).
I think when you look at the final outcome the film was worth the time and effort. The biggest challenge is time management as it is impossible to create over 1000 drawings in a day so many students give themselves a weekly challenge of total frames to draw.
Last modified: March 15, 2017